I bought DHT11 Temperature and Humidity Sensor module on Akiduki denshi website in Japan.
http://akizukidenshi.com/catalog/g/gM-07040/
It's cheep sensor about 500 yen.
Datasheet is here.
http://akizukidenshi.com/download/ds/aosong/DHT11.pdf
It's Easy to handle on Raspberry Pi.
1. Connect to Raspberry Pi(RPi)
2. Programming
3. Execute

1.Connect to RPi
The sensor has 3 ports. These ports are connected to harness, which are colored, red, black and green.
I connected to RPi as following.
(Sensor -> Rpi)
Red code(VCC) -> +5V
Black code(GND) -> GND
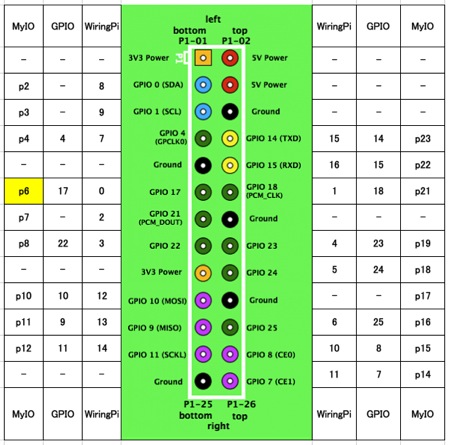
Green code(Data) -> GPIO23
RPi GPIO
http://www.pwv.co.jp/~take/TakeWiki/index.php?plugin=ref&page=raspberrypi%2FRaspberry%20Pi%E3%81%A7IO%E5%88%B6%E5%BE%A1&src=My-Pin-Layout.jpg
2.Programming
I used these sample codes.
http://dolls.orz.hm/?p=9000
The remarkable point is PIN assign.
I used DHT11PIN as "4".(the following code)
"4" means wiringPi pin number. It is GPIO23.
(connected to green code)
I changed as continuous output in "main" function.
because the sample code was one shot output.
copy code and paste and save as dht11.c
#include <wiringPi.h>
#include <stdio.h>
#include <stdlib.h>
#include <stdint.h>
#include <time.h>
#define MAX_TIME 85
#define DHT11PIN 4
int dht11_val[5]={0,0,0,0,0};
int res;
int dht11_read_val()
{
uint8_t lststate=HIGH;
uint8_t counter=0;
uint8_t j=0,i;
float farenheit;
for(i=0;i<5;i++)
dht11_val[i]=0;
pinMode(DHT11PIN,OUTPUT);
digitalWrite(DHT11PIN,LOW);
delay(18);
digitalWrite(DHT11PIN,HIGH);
delayMicroseconds(40);
pinMode(DHT11PIN,INPUT);
for(i=0;i<MAX_TIME;i++)
{
counter=0;
while(digitalRead(DHT11PIN)==lststate){
counter++;
delayMicroseconds(1);
if(counter==255)
break;
}
lststate=digitalRead(DHT11PIN);
if(counter==255)
break;
// top 3 transistions are ignored
if((i>=4)&&(i%2==0)){
dht11_val[j/8]<<=1;
if(counter>16)
dht11_val[j/8]|=1;
j++;
}
}
// verify cheksum and print the verified data
if((j>=40)&&(dht11_val[4]==((dht11_val[0]+dht11_val[1]+dht11_val[2]+dht11_val[3])& 0xFF)))
{
time_t timer;
struct tm *date;
char str[256];
timer = time(NULL);
date = localtime(&timer);
strftime(str, 255, "%Y/%m/%d %H:%M:%S", date);
printf("%s ,", str);
printf("Humidity = %d.%d %% Temperature = %d.%d *C\n",dht11_val[0],dht11_val[1],dht11_val[2],dht11_val[3]);
return 2;
}
}
int main(void)
{
if(wiringPiSetup()==-1)
exit(1);
while(1)
{
res = dht11_read_val();
delay(1600);
}
return 1;
}
3. Execute
Before execute, install wiringPi.
http://wiringpi.com/download-and-install/
make the programming code.
gcc -o a.out dht11.c -L/usr/local/lib -lwiringPi
and execute.
sudo ./a.out

0 件のコメント:
コメントを投稿